Breakout Trades: Master These 2 Setups for Consistent Profits with Supply and Demand

Forget chasing random breakout trades that always seem to fizzle. I’ve learned that real money is made by focusing on breakouts at strong supply and demand zones. These represent clear shifts in market sentiment, and in this post, I’ll teach you the two core setups I use to profit from them.
The Power of Breakouts (and Why Context Matters)
Breakouts signal that buyers or sellers have taken decisive control. The key is to focus on breakouts with context – those happening at established supply and demand zones. Random price spikes usually fizzle out, but breakouts backed by big money often trigger a cascade of follow-through buying or selling.
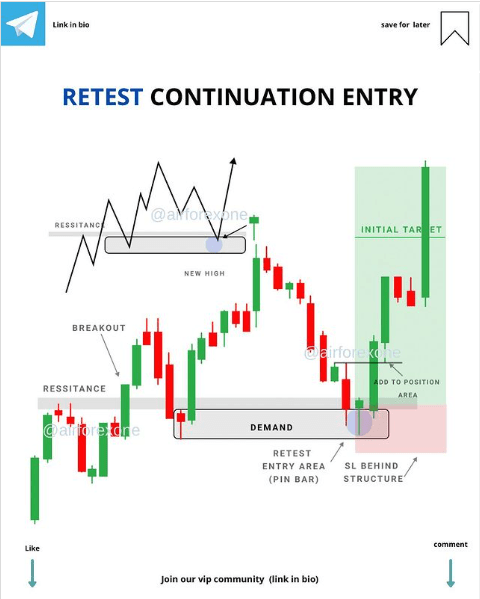
Breakout Setup #1: The Classic Breakout and Retest
This is the bread and butter of breakout trading:
- Strong Zone: Identify a clear supply or demand zone with a history of strong reactions.
- The Breakout: Wait for a convincing break above (supply zone) or below (demand zone).
- The Retest (Key!): The old zone should become new support/resistance. Be patient and look for a retest that holds.
- Volume: A surge in volume on the breakout and retest confirms the move.

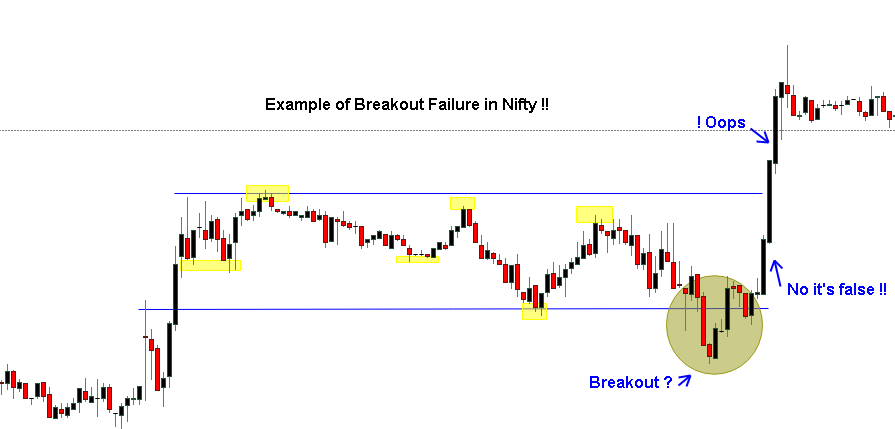
Breakout Setup #2: The Failed Breakout Trap
This one’s for contrarians:
- Weak Breakout: Price weakly pokes out of a zone, lacking momentum and volume.
- The Fakeout: Price reverses, trapping those who jumped on the breakout.
- The Spring: A decisive move back in the opposite direction, often fueled by trapped traders scrambling to exit.

Mastering Breakout Trades
- Stops: More Than Just Invalidation Yes, your stop-loss should be beyond the zone boundary to get you out if the breakout fails. But smart stop placement goes deeper:
- Breakout and Retest: Place your stop beyond the furthest extreme of the retest to avoid getting shaken out by normal volatility.
- Failed Breakout Trap: You can be more aggressive, placing your stop just above/below the zone since these setups are often more explosive.
- Targets: Think Beyond the Next Zone. While the next supply/demand zone is your initial target, consider these factors:
- Momentum: If momentum is exceptionally strong, be ready to let part of your position run, aiming for a bigger move.
- Market Structure: Is the breakout in line with the overall trend? Trend-following breakouts tend to have longer legs.
- Trailing Stops: The Art of Locking in Gains Trailing stops are a powerful tool, but here’s how to avoid common mistakes:
- Too Tight, Too Soon: Don’t choke off winning trades prematurely. Give the price room to breathe.
- ATR: Consider using an Average True Range (ATR) based trailing stop for a more dynamic approach that adapts to volatility.
Real-World Examples
Let’s make this section practical:
- Example 1: Classic Breakout and Retest
- Market: Forex (EUR/USD)
- Timeframe: Daily Chart
- Chart: Show a clear demand zone, the sharp breakout, the clean retest, entry placement, stop, and target.
- Commentary: Briefly explain why the zone was strong, the volume confirmation, etc.
- Market: Forex (EUR/USD)
- Example 2: Failed Breakout Trap
- Market: Stock (e.g., tech stock with hype)
- Timeframe: Hourly Chart
- Chart: Show the weak breakout attempt, the reversal bar, the entry, the tighter stop, and the target.
- Commentary: Emphasize the low-volume breakout and any other clues that it might have been a trap (news, overall market sentiment, etc.)
Breakouts are tempting, but they’re often fool’s gold without the filter of supply and demand. You’ll trade with the odds by focusing on breakouts within a strong context. It takes patience and practice, but the potential rewards are worth it.
Want more actionable trading strategies? Download my free checklist, “5 Signs of a High-Probability Breakout”, and start spotting setups like a pro.
Important Note: Make sure the charts are clear and well-annotated to illustrate your teaching points. Regarding technical setups, a picture is worth a thousand words!
Ready to take your trading to the next level? Explore these top forex signals today and see how they can enhance your trading strategy. Continuous learning and adaptation are key to staying ahead in the ever-evolving forex market.
Curious about which forex signals can best support your trading strategy? Join our community at The Signals Oracle, where we provide actionable insights, expert analysis, and a supportive network to help you succeed. Sign up now for our free resources and start your journey towards more informed trading!
Ready to put these skills to the test? Sign up for a trading signals package risk-free today!